Wednesday, August 31, 2011

Fiber Harvest: Hanging our Show

Today the members of the Connecticut Fiber Arts Collective met at the Noah Webster branch of the West Hartford Library, 20 So. Main St., West Hartford, CT, to hang our show, Fiber Harvest.

L-R, Carol Vinick, Rosalind Spann, David Wright, and a library patron
How proud are we of our show, and of working together to hang it?  L-R, Jeanne Landry Harpin, Mary Lachman, Diane Cadrain, Diane Wright, Carol Vinick, Rosalind Spann, Carol Eaton
And what a show.  Take a peek at our work!
L-R, Harvesting Wheat by Carol R. Eaton; Grapeology by Karen LoPrete; and Harvest Moon by Mary Lachman
L-R, Harvest Moon by Diane Wright; How does your Garden Grow by Carol R. Eaton; Papa's Greens Harvest by Rosalind Spann
Quilts by Diane Wright.  Top: Windfall. Bottom:  Harvest of Leaves.


Hanging Grapes by Diane Cadrain
Autumn's Bounty by Jeanne Landry Harpin

Grape Harvest by Carol Vinick

The Fruits of our Labor by Carol R. Eaton
And here's Laura Crosky, the West Hartford Library staff member who made our show possible.  Thanks, Laura!

Tuesday, August 30, 2011

Now I'm making sleeves for noodles?

Thoreau said we're become the tools of our tools, and I tend to think he's right, especially last night, when I constructed sleeves for noodles.

Sleeves for noodles?  By "noodle," I mean the styrofoam kind that kids use when they're swimming.  It turns out that noodles are very useful for the storage of quilts.  You wrap the quilt around the noodle, pin or tie it shut, and it's safe.

But first you have to cover the noodle with cloth--a sleeve, if you like, or a sock, or even a condom.  Call it what you will, it's a sheath for the noodle.

Last night I cut up an old bathroom curtain that was in my stash and made sleeves for noodles.

Here's a noodle wearing a sleeve made from a bathroom curtain.  I used the rod pocket from the curtain to construct a drawstring, then constructed a new drawstring on the other end.  Such a fashionable noodle.  And now it will have safe sex.

Here are 2 of my quilts, wrapped around their newly-sheathed noodles.

What would Thoreau say?


Sunday, August 28, 2011

What do you do when you find end caps? Save them for end times.

Today I took advantage of a period of enforced home confinement, courtesy of Hurricane Irene, to clean out and reorganize my tiny work space. It's a pain in the buttsky job, but one I knew I needed to do to get ready for some upcoming obligations:  in November and December, a group show with other members of Women Against the Grain at the Farmington Valley Art Center; and in May 2012, my own solo show at UConn Health Center.
I want to create a series of smaller works for the Farmington Valley Art Center and a few dramatic, larger works for the UConn Health Center.
To clear the decks for that upcoming body of work--stand by for a preview--I needed to focus on the efficiency of my use of my limited storage space, inventorying the contents of my system of cabinets and boxes, consolidating like with like, and reviewing my stock of supplies like Pebeo Setacolor paints and finely woven pima cotton. By doing that, I minimized the amount of distraction created by clutter, disorganization, and supply interruptions.
Oh, I was virtuous.
Inventoried, reorganized, streamlined, consolidated

Order imposed

In the process, I looked through my box labeled Notions, the contents of which include shower curtain rings, drapery hooks, cording, elastic, and velcro.

 
Why do we call miscellany like this "notions"?  The departed department stores of the sixties, like the Edward J. Malley Company in New Haven, where I shopped in my high school and college years, had notions departments where customers could find things like emergency sewing kits and padded hangers.  Why notions?
The Oxford English Dictionary, of which I have a two-volume set from my days as a graduate student at Ohio State, gives this as definition #9: "articles or wares of various kinds, forming a miscellaneous  cargo," using the following quotation as an example of that usage: "A cargo of fresh provisions, mules, tin bake-pans and other notions," Richard Henry Dana, Before the Mast.
Now that I cleared that up.
Here's a peek at some of the goodies I'm planning on making over the next few weeks and months:

How about this little display?  This will be for the Farmington Valley Art Center Show.  I'll print this photo on fabric, make it the centerpiece of a quilt, and call it Deconstruction.  Why not?  The deck is full of squirrel detritus from our Norway spruces: partially-eaten cones and their scales.   

It's not like I don't sweep the deck.  These conifer scales fall like snow, courtesy of the squirrels above. Question of the day:  do pine cones taste to squirrels the way artichokes, which they so resemble, taste to us?

Just for fun, I'm going to add some real scales from the cones.  To that end, I gathered a bunch of them the other day and dropped them into a solution of warm glycerine and water. 

 and I'm drying  them out on a piece of paper towel:

Once these cone scales are dry, I'll paint them with polyurethane before using them in the quilt.  I'll puncture each one with an awl and sew them on by hand.  They'll dribble down from the pile of scales in the photo.

For the UConn Health Center, I'm planning a group of larger works, such as a series called Penwood Long Blue Shadows, which will include images such as the following:

I'm going to make the long blue shadows with painted stiffened cheesecloth.  I can hardly wait.

Anticipation of projects like these gave me the incentive I needed to get through this major workspace inventory and upheaval today.  In the process, I came across a few mystery items, like these white plastic objects:
Who can tell me what they are?  They look like some sort of end caps.
I think I'll save them for end times.


Thursday, August 25, 2011

Salute to Grandpa Ott

Grandpa Ott comes back to haunt me every year, so vigorously, and so faithfully, that despite my efforts to eradicate him, I finally have to give up and salute the blind life force that drives his flower. 

Grandpa Ott is the man who gave his name to a lush purple variety of morning glory:  according to the lore of the gardening world, John Ott was a Bavarian immigrant who passed this variety of morning glory down to his granddaughter, Diane Whealey, in 1972.  The deep purple flowers inspired her to start the Seed Saver's Exchange, a nonprofit organization dedicated to saving and sharing heirloom seeds.

I planted Grandpa Ott morning glories once, only once, in my garden--years ago.  That year, I wanted a bed of annual vines, so I erected bamboo teepees and on them grew hyacinth bean, cardinal climber, and Grandpa Ott morning glories. The next year, I went on to try something else, and then something else.

Still, each year, toward the mid to end of the summer, I'd see Grandpa Ott surfacing in my garden, and I'd pull him out every time.  Inevitably, every year, I would overlook a vine, and a lush purple morning glory would appear between the leaves of plants I'd intentionally planted, its throat painted with five stripes of brilliant magenta.

Here he is in September, 2010, overtaking santolina and sweet basil.  How can I begrudge him those luscious flowers, even though the vines that carry them are so invasive?
 
Still, this year, I set out as usual to pull out the Grandpa Ott seedlings, not wanting them to overtake my carefully-planted silver garden, with its catmints and Russian sages.  As always, I regretted eradicating the large heart-shaped leaves and the vigorous, twining vines.

This time, I resolved to find another place to put him, and I found it:  along the driveway fence, where the available growing medium is asphalty rubble, and rugged weeds like goldenrod grow happily.


  I'm so taken with the lush, heart-shaped leaves that I decided to try sunprinting them.


I used this sunprint as a background for a quilt called Salute to Grandpa Ott.  I embellished it with still more sunprinted morning glory leaves, each freestanding, backed and wired and inserted into the sunprinted background.  I added free-standing morning glory flowers too.


And that's my salute to Grandpa Ott.  It was the least I could do.

Friday, August 19, 2011

Glowing Cabbage III: The Last of the Glowing Cabbages?

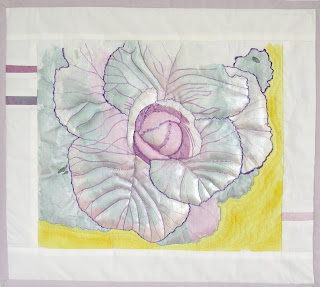
I've spent the last couple of weeks working on cabbage images, making two small whole-cloth painted quilts and one larger pieced quilt.  Today the larger pieced quilt, Glowing Cabbage III, makes its debut.

To make it three-dimensional, I padded the central head with polyester fiberfill and wired each leaf so they would be free-standing.  Here's a detail shot:


The leaves were originally sponge-painted with Pebeo Setacolor watercolors, then details were added with more Pebeo Setacolor plus Jacquard Lumiere acrylics.  The veins were created with machine satin stitching. 

This Glowing Cabbage III, and Glowing Cabbages I and II before it, were all based on this photo of a cabbage I grew in a pot on my front porch:

These three glowing cabbage quilts, along with another one called Hanging Grapes, together comprise my offerings for Fiber Harvest, a quilt show sponsored by the Connecticut Fiber Arts Collective which will be hanging in the West Hartford Public Library for the month of September.  After that the show moves to the Middlefield and then the Southbury public libraries.

Sunday, August 14, 2011

Cabbages: Ready for their Head Shots. Grapes: Hanging Around.

Grapes and cabbages.  These are the images I'm creating for a harvest-themed show, soon to be unveiled by the Connecticut Fiber Arts Collective (CFAC), and about to appear in the public libraries of West Hartford, Middlefield, and Southbury.

Grapes.  Because we CFAC members got together to dye fabric with grapes, thinking ahead to a harvest-themed show.

Cabbages.  Because I grow them and consider their purple-veined, frilled, frosted leaves one of nature's exquisite creations.

I've chronicled these grape and cabbage quilts since their inception.  Today, they're finally completed. The cabbages are ready for their head shots and the grapes are hanging around waiting for theirs.

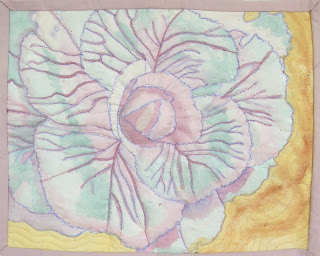
The two cabbage quilts, Glowing Cabbage I and Glowing Cabbage II, were two small studies for a larger cabbage quilt.  These two smaller studies taught me what I need to know about the properties of watercolors versus acrylics on fabric. I used watercolors for Glowing Cabbage I and acrylics for Glowing Cabbage II.  Now that I understand their properties, I'm using that information to make a third cabbage image, Glowing Cabbage III, incorporating best features of each kind of paint.  That one is still under wraps.  Meanwhile, here are the studies:


Glowing Cabbage I was made with Pebeo Setacolor watercolor paints.

Glowing Cabbage I--detail

Glowing Cabbage II was made with Jacquard acrylic paints

Glowing Cabbage II--Detail
Grapes.  Because we CFAC members got together a few weeks ago to dye fabrics with grapes, I also created a grape image, using some of the grape-dyed fabrics.  I combined those with sunprints of grape leaves.  Today that grape quilt is ready for its debut.
Hanging Grapes--Full.

Hanging Grapes--Detail
Now that I'm into sunprints, I'm also working on a sunprint of morning glory leaves.


Morning glories.  The image I've created will be called Salute to Grandpa Ott.  Who the heck is Grandpa Ott?  Stick around and find out.


Chinese Market Tour and Dumpling Fest

What a thing to do on a Sunday morning: tour an Asian market and learn to make Chinese dumplings.

When I saw that West Hartford Continuing Education offered an Asian market tour and dumpling workshop,  I had to sign up.  Not only am I crazy about dumplings--I've made them before, but always as taught by a cookbook, never by a native Chinese person--I'm also curious to learn about the exotica of a big Asian grocery store.

Asian Market Tour and Dumpling Workshop

Curious, overwhelmed or intimidated by Asian markets? Want to learn about popular Asian produce, products, and shortcut tips for making classic or creative Asian dishes at home? Enjoy new food, culture, travel and shopping? If so, this tour is for you. Join Ming Hua He, well-known Chinese culture and travel expert for this fun, unique, culinary and cultural experience. Begin the guided tour at A Dong Asian Supermarket, then drive to Yin Yang Tai Chi Academy for a dumpling cooking class. You will learn the secrets of making authentic home-style dumplings. Highlights include fresh Asian fruits and vegetables, "oodles of noodles," "mad about rice," "some like it hot spices," "Asian snack attack," dumpling lesson and the uses of kitchen tools and pantry essentials. Please bring you own apron and a cookie sheet or pizza pan to take leftovers home. 


We met our teacher, Ming Hua He, at the A Dong supermarket on New Britain Avenue in West Hartford:


Our teacher, Ming, took us around A Dong and showed us some high points.  Here:  Bitter melon.


 Cut bitter melon in half lengthwise, scoop out the insides, blend the inner part with pear or apple, drink.  Ming told us to Google it, and when I did, I learned that bitter melon has antimalarial, antiviral, cardio-protective, and anticancer uses.  (Is that all?)

Buns--Banh Bao in Vietnamese--packages of dough, like dumpling dough, wrapped around filling of eggs, sausage, and chestnuts.  "Best Asian thing," according to Ming.

Sesame balls--banh cam in Vietnamese--have sweet sticky rice and red beans inside.  No cooking required.

Bean curd threads, preserved duck eggs, long beans, five spice tofu, white rice cakes, green mung beans, black sesame powder, dried lychi, congee--Ming showed us all those, and more--and told us how to cook them.  I took 7 pages of notes.


After touring the highlights of A Dong, the class reconvened a few blocks away at Yin Yang Tai Chi Academy, where we learned to make dumplings from scratch.  


And by that I mean, with flour and water, hand-forming our own dumpling skins.  Until now, I've made dumplings with gyoza skins from Stop & Shop.  When I said that to Ming, she made it clear that using commercial dumpling skins puts the faux in faux pas.


Dumpling ingredients:  these amounts made enough for everyone in our class of 8 to make at least a dozen dumplings apiece:

4 cups unbleached flour, 2-1/2 cups water, mix with chopsticks:


Knead dough in bowl (use the heels of your hands, in a motion similar to that of kneading bread dough).  Wrap dough in plastic and let rest for half an hour while you make the dumpling stuffing:


Stuffing: 1-1/2 lbs ground pork, 1/2 c chicken broth with a raw egg mixed into it, mix with pork.  Then add these seasonings:  1 T ginger juice (made by pulsing peeled fresh ginger root in a food processor and adding a little water), 3 T soy sauce, 1 T oyster sauce (Ming recommends Lu Kim Kee Panda Brand), 1 T soybean oil, 1/2 tsp salt.  Stir in 1 direction (Ming says this is essential for flavor), then add 3-5 c chopped Chinese chives, a variety of chive that seems to be far more pungent than the kind I'm used to.

Then work on the dough.  


Using a handful-sized piece of dough, form it into a flat circle, then a doughnut.

Make the doughnut into a rope

Pinch off walnut-sized pieces of the rope

Then use a mini wooden rolling pin, called a dumpling roller, to roll the dough out into a circle.


Put about a tablespoon of filling into the center of the dumpling skin, then pinch the edges closed around the filling.  Ming showed us a special way to do the folding, better learned by seeing than reading.


And we each went home with a couple dozen dumplings!  To cook, put oil in a flat frying pan, then 1 c water.  Turn heat to high. When bottom of dumpling is brown, turn them over, cover, and finish on low heat.